Planting Grass Plugs
Grass plugs can be planted at any time of year, when the weather is mild. If you plant in Spring (end March), you will receive the benefit of a full growing season. If you plant warm season plugs in the Autumn/Winter, then not much will happen (depending on temperatures) and the plants may stay dormant (or stay brown) until the following spring (end March). If you plant in the heat of the summer, then the plugs will establish quicker, but will require more water to get them established.
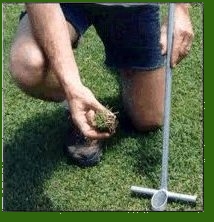
Our plugging tool is easiest, but an auger, dibber or small trowel will also work well. We will assume that you are using our plugging tool.
If you are planting a new lawn and you have followed the guidelines for planting a new lawn, and the ground has been prepared, tamped down, watered thoroughly, leave for about 1 hour and make a test plug. The plugging tool should easily penetrate the soil to its full depth (6cms). If not, then water the ground again.
Now try a second plug. If the 2nd plug does not push out the first plug from the plugging tool, then the soil is still compacted and clayey. This will require more soil treatment, i.e. more compost, sand, humus etc worked into the top few inches of soil. See soil preparation.
General - Decide on the plug
spacings you require (this will largely depend on your budget, timescale and height of grass plug). For example, grass plugs that are 8" high, when planted (based on an 8" spacing), will fall over and touch the plant next to it, thus giving you a time advantage to establishment. Then, planting is performed in a diamond shape not a square. This means that all grass plugs are the same distance from each other.
To begin plugging, place the plugger above the insertion point and press firmly with both your hands and by applying pressure with your foot, until the footrest hits the soil. This is set to a depth of 6cms. While the tool enters the soil, the previous plug is pushed out of the top of the plugging cylinder.
Rotate the plugger by about 15 degrees and start to remove the plugger whilst still rotating the tool. If the soil has been previously prepared, compacted and watered correctly, then there should be a clean 6cm cylindrical hole with no debris or soil falling back into it.
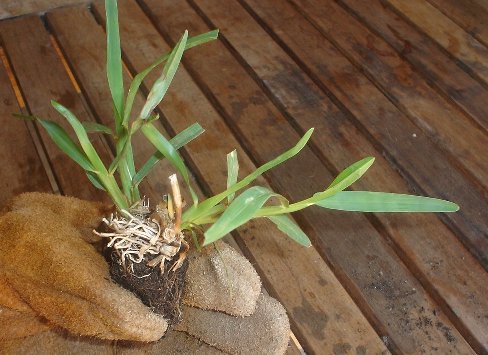
With the tray of grass plugs,
for 80 capacity plastic trays grip the grass plug firmly at the base and pull.
For 100 and 200 mature plants in polystyrene trays using a sharp serrated steak knife cut down two sides
of the plug at 45 degrees and lever out the plant. Depending on the age/size of the
plant, this may need to be done on two or three sides before the plant
can be removed.
Alternatively upturn the polystyrene tray and slice up the compartments with a serrated kitchen knife, and rub away the polystyrene from the plug.
We recommend you sprinkle some of our starter/seedling lawn fertilizer, about 1/4 teaspoon (you will need 500 - 700 gms per 200 plugs) into the bottom of the hole. Planting plugs without our L.I.S. starter fertiliser is risky. (For the best results, after planting the plugs, depending on the quality of the original soil, we recommend you fertilise with L.I.S. fertiliser every 10 - 14 days until established).
Place the grass plant in the hole and firmly press down
until the plant is inserted firmly into the soil, to the bottom of the hole.
If the new plugs have grass longer than a few inches then it helps to
plant the plugs at an angle, so the stems lay flat to the ground.
DO NOT be tempted to empty a complete tray, make the hole apply the fertiliser and then remove the plug and plant it. This is important
because if the plugs roots are left to go dry then the plant is in danger of dying
Do not mow at this
stage.
If the plants are not laying flat after a week then roll or tread them flat.
Keep the soil damp at all times until new growth is seen, but basically follow the guidelines on watering a lawn.
Follow the guidelines on watering
a lawn.
Mow when new growth is seen, and is more than 2.5" high.
Note: During the growing season the grass plants will show signs of new growth in a week.
The rule with Grass Plugs, to achieve an established lawn in the fasted time is to follow the advice on watering, together with fertilising every 10 days until you have an established lawn.
Planting plugs before Seeding - When finished planting the plugs, and if you require to sow our specially selected grass Nursery/Winter seed, rake between the plugs to rake in the seed. If possible spread topsoil etc over the seed to help germination - no more than 1/4 inch. see seeding a new lawn.
Planting plugs after Seeding - Use a wooden plank to stand on. This will spread the pressure over a larger area and not damage the new grass seedlings.
Follow the guidelines on watering a lawn.
 Tip 1: Mark the side of the plank (3", 6", 8" etc) with
aerosol spray paint, and then you can use the plank as the measurement
and move the plank. This reduces your work and will ensure that you are always at the
correct distance.
Advance the plank to the required distance and displace the plank to ensure a diamond planting pattern.
When finished, water the plugs thoroughly (50 -100 cc per plug every day for at least 3 - 4 weeks). Follow the guidelines on watering a lawn.
 Tip 2: When you have finished planting your plugs, plant some
test plants (flowering border plants are ideal e.g. Coleus, alyssum,
lobelia, salvia, violas, petunias etc) around various places in your lawn. The progress
of these test plants will give you a very good indication that your
soil is ok and your watering regime is also ok. When the lawn is
established, these test plants can be pulled up.

 Planting in an existing lawn.


